Interior toggle lamp/switches - repair procedure

| Last modified 2005 APR 07 04:37:58 GMT |
To: xj-s@jag-lovers.org
One of the (several) problems with the lighting in my XJSC when I acquired
it were the two rear courtesy lamps. I popped them out and found that the
switch assemblies (the lens itself is the switch), were broken at one of the
pivots: the little metal-clad plastic nub was sheared off. Both switches
suffered this same problem.
I contacted Jaguar Heaven and found that they wanted $30 apiece for salvaged
switches. While I've got some other stuff I expect to be ordering from them,
I didn't feel that it was worth ordering a couple of used lamps if I could
fix the two I have (and reinforce them in the process). Here's the procedure
I used:
First, remove the lamp assembly. This is easily accomplished - the wiring
harness uses a form of bullet plugs, and all you have to do is unplug them.
Note that there are two conductors on one side (the switch side), and a
grounding wire on the other. One of the hot conductors is wired to the
door/courtesy lamp circuit, and the other is 12V constant. You probably want
to make note of what wire goes where, but it should be easy enough to figure
out when you have the switch fixed anyway.
[Noted on both sides in my car: Purple/pink: ground. Black = constant 12V+,
purple, courtesy 12V+]
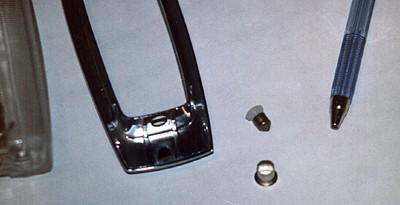
Examine the switch assembly - if yours failed the way mine did (and which it
appears to be the one real weak spot), then the side where the two hot wires
plugged into the assembly is the one that is loose.
[Note: D.U.M.B. design -- the side with the torque and spring pressure is the
one where the pivot is the plastic nub -- the OTHER side is a fully metal
sleeved peg, which they could have done on both sides, or AT LEAST, have used
the sleeved peg on the torqued side. Grumble.]
Things to look for are the small metal bearing and pressure spring (on the
hot lead side) - these provide the "click" and switch detent. Chances are,
the bearing is missing, and the spring may be as well (though in my case, I
am happy to report that the springs had remained in the assembly for both
lamps). If not, retrieve them and don't loose them. An envelope or
zip-lock baggie is a good place to put these small parts, though I have a
collection of clear plastic parts bins (6.5"W x 12.5"L x 3.5"H) which I use.
A quick look around the mounting location of the lamp, or brushing it with a
telescoping magnet (I've a neat mini-flexi lamp with magnet tip that works
well for this) might turn up the bearing or spring if they're missing.
Take a pair of needle nose pliers (my needle nose Leatherman(tm) tool worked
wonders here) and gently pull the lower spring (spring metal - not a coil
spring like in the switch itself) on the grounded side of the assembly
towards the middle of the lamp, while pressing down on the top of the spring
(so you don't torque it too much on the plastic lens). This is so that you
can get to the metal sleeved pivot pin that is in the housing on that side.
Pull out the pin and set it to the side in your parts bin.
Now you should have the metal sleeve exposed (specifically, there's enough
room to get at it from the side -- no pin occupying the middle). Take the
tip of your needlenose and carefully pull out the flaring (a slight bend
inward), stopping to rotate the sleeve every 2 or 3 crimps so that you keep
the part you're aligning on the open side of the ring (versus the side right
behind the faceplate, which interferes with the pliers' straightening motion).
When you've got the flare crimped out, you should be able to push the sleeve
back through the pivot hole towards the lens, where it will pop through (or
at least far enough back to clear the pivot hole to permit the lens to come
free of the frame). Remove the lens from the frame.
I did a bang up job on my first sleeve, so I took a metal-tipped disposable
pen and removed the ink and tip from it, and used the metal tip of the pen
and the pliers to carefully form it back into a proper circle, until I could
insert and remove the sleeve in the lamp housing pivot hole to my
satisfaction (I also did some light deburring with a sanding disc on a
Dremmel). A carpenters nail countersink tool could accomplish a similar
reforming job on the sleeve.
You're basically halfway there.
Now, you need to take the broken plastic pivot pin (from the other side of
the assembly) and the lens and carefully drill a hole into them (this is for
reinforcing them against a repeat of the shearing - if you simply epoxied or
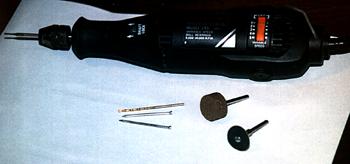
superglued them back, they'd eventually break again). In preparation for
this, I got a couple of fine finishing nails (1/16" diameter), and using a
Dremel(tm) tool with a grinder bit attached, ground off the sharp points
until they were both basically flat. I switched bits to a sanding disc, and
sanded the burrs from the tip (not rounded, just nothing to catch on the
plastic).
First, with a felt-tip marker, mark the centre of the pivot pin and the
shearpoint on the side of the lens. If you'd like, you can use a pushpin to
make a slight divot at that marked spot (start with the broken off tip first
- don't divot the lens just yet). The slight divot is helpful in providing a
natural resting spot for the tip of the drill when you start drilling.
Insert a 1/16" drill bit into the Dremel (or equivalent drill tool), and
drill into the broken-off tip first (reason: it is MUCH easier to make a
positional error here because the part is so small, and as such, you can then
turn around and offset the hole you'll drill into the lens housing, where you
have more control, to compensate). Hold the tip firmly in a pair of pliers
or in a vice (but be careful not to apply so much pressure as to cause it to
deform or collapse). Drill down about 3/32 to 1/8" (there isn't much plastic
here to work with to start). Take the deburred tip of the finishing nail and
insert it into this hole and see how snug it is. Now, switch to the lens
housing and drill into it (repositioning the mark and using a pushpin to
divot as necessary - if you're off centre, note that the tip probably didn't
shear precisely flush to the lens -- remove the peg and mount it as if you
were fixing china and trying to line it up right). Note that from the side,
you can see how far your hole has gone into the plastic -- I'd suggest you
stop drilling about the point where you've got about 1/16" inch left of lens
before you've drilled all the way through (to get a more snug peg fit, and to
keep the metal pin from even possibly making contact with the hot lead
assembly - a no-no if you've drilled the tip to the point of making contact
with the metal -- you could conceivably ground out the hot leads to the body
when the lamp is switched on), though drilling all the way through shouldn't
hurt.
Clip the finishing nail to approximate length, and try a test fitting to see
how well aligned the pivot is. With the sanding or grinding wheel reattached
to the Dremel, finish the peg to length and deburr it.
After a test fitting, prep the surface sheared area of both the lens and the
pivot, plus a bit extra in the hole with superglue (if it isn't real snug),
and assemble.
The hard part is done - and if you've done a reasonably good job of drilling
and gluing, the part is now actually BETTER than new - with the finishing
nail dowel in the pivot pin, the part is protected from risk of future
shearing.
Now for reassembly. If you've got all the parts, this should be accomplished
easily enough. If you're missing the bearing and/or spring, there are some
makeshift replacements:
bearing: copper/brass BB's (not pelets - BBs) may work. Sporting goods store
might have some, or that old Daisy Model 103 sitting in the back of your
closet might have some left in it. Your auto parts store might have some
bearings this size - they might also have a spring too. The bearing is 1/8"
diameter.
Insert the spring into the plastic frame (there is a small recess between the
two contacts), and set the bearing on top of that (note that is is most
easily accomplished with the frame face up).
Take the metal sleeve, if you've completely removed it from the lens, and
jiggle it into place over the pivot hole (on the lens, just under the ground
spring), and use needlenose pliers to get it in (this is fairly easy to do if
you've reshaped it properly). Press it into the pivot hole until it aligns
with the outside of the hole. Drop in the pivot pin, and re-bend the backing
spring (reapplying sufficient pressure on the backside of the pin to push the
tip through the sleeve, being careful about the torque you're placing on the
riveted-through lens).
Holding the frame and lens above your parts tray (in case you should drop the
bearing), insert the lens from the bottom side of the assembly, rebuilt pivot
side first, down onto the bearing. When the side of the sleeve (with tension
on it from the grounding spring) contacts the side of the frame, take your
finger and press it down until it clears (there isn't THAT much spring
pressure on it), and then slide it in. Align the lens such that the sleeve
pops through the pivot hole in the metal frame, and you're home free.
Apply power to the assembly and test. When you're sure it works, remove
power and carefully reapply a flaring to the pivot sleeve, and reinstall
(note, the proper reinstallation would be to insert the hot side first
(since that isn't a spring pivot), and then push the springy side in).
My cabin lights now work like new.
From: Sean.Straw+Jaguar@mail.professional.org
Subject: Toggle lamp/switches - repair procedure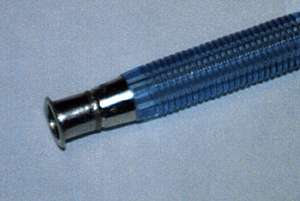
spring: I would have thought that a spring from an "old-style" push-click
cheapo pen would work, but it is too large. Pop it open, steal spring, cut
to fit. This spring looks to be something you'd order from Small Parts, Inc
(1 800 220-4242), and they'd probably have the bearing too. Unfortunatley,
I didn't measure my springs when I had them out, but the spring comes flush
to the top of the hole it rests in, so take a wooden match and sit it in the
hole, mark it and remove it to get the length. 1/4" seems about the size.
Fairly stiff.
If you've got at least one complete lamp, pull it out and take it with you to
the parts counter and see if they can't match the bearing visually - even
when assembled, the bearing is quite visible.![[TOP]](/graphic/JagUpBar.gif)
Sean B. Straw
EMail to: Sean.Straw+Jaguar@mail.professional.org