Gasket Making Tutorial

| Last modified 2013 JAN 31 15:09:25 GMT |
Every so often, you find that you need to replace a gasket - usually when you are part way through a part restoration which has immobilised your automobile, and ordering and then waiting for a gasket to arrive (for surely, your local supplier won't have it) isn't an option. Most recently, I was replacing the rubber bootie in the fuel filler compartment on my XJ40, and after disassembly of the part, I discovered that the gasket for the little "box" wasn't complete and needed replacing.
Of course, I didn't have the gasket on hand, since I hadn't entered the repair project with any expectation of replacing anything other than the worn rubber reservoir bootie, nor had I disassembled the part beforehand -- the repair was being effected because of rainwater intrusion into the boot, so removing the box beforehand would have only served to complicate things.
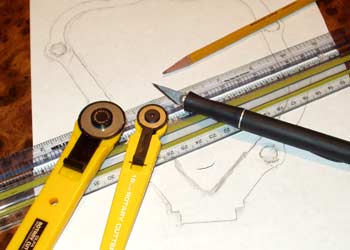
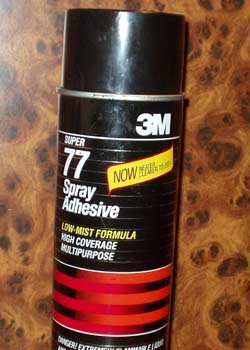
The necessary tools vary depending upon the method you use to produce the template, but I find the following selection of tools and components to be useful to have on hand: an X-Acto graphic arts knife (aka "Pen knife"), a small diameter "OLFA" rotary cutter (the smaller the diameter, the easier it is to cut small radiuses), a straightedge (I use a dual metric / Imperial rule, useful for measuring distances on the original object as well as on the template, to confirm dimensions), a pencil (traditional sharpened type, not mechanical) or artists charcoal. It should go without saying that razor sharp cutting implements will ensure a clean, exact cut - whipping out a fresh X-Acto blade wouldn't be a half bad idea. Also, a roll of butcher paper, or other large format paper to allow you to take a rubbing of items larger than a conventional letter-sized page (if you're fresh out of butcher paper and need a large paper, don't overlook the backside of gift wrapping paper, particularly that pattern that's really ugly and thus never gets used for gifts). 3M Super 77 spray contact adhesive is useful for providing some tack during some stages, and is also useful for affixing foam gaskets. You'll gag when you see the price - it's about US$14 a can, but once you use it, you'll realize that it is very versatile, and the can will last you quite a while.
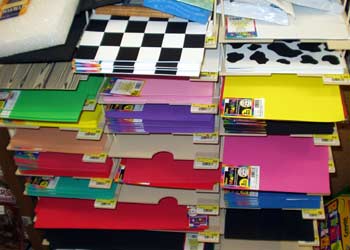
Gasket material varies depending upon the specific application - temperatures, oil/petrol resistance, compressability, hydroscopic resistance, etc. In some cases, paper itself is a suitable gasket. While I neither work in, or run an automotive shop, I find that it is a good idea to stock a variety of suitable gasket materials in your toolbox, as it spares you the hassle of having to source it when you have a dismantled part in your garage. Materials include rubberized cork, high-temp silicone, paperboard, aluminium and copper foils, and foam. The first three should be readily available at your autoparts vendor, the foils may be as well, but the last one is a bit trickier - don't bother with a "foam specialist" shop, which will charge you an arm and a leg -- instead, head to your local craft store and look for sheets of "Foamies", available in a few dimensions and in 2mm, 3mm, and 6mm thicknesses, and a LOT CHEAPER than a foam shop is going to gouge you for. An alternative source for a quality rubber gasket material might be a dive shop - you could salvage neoprene from old wetsuits (say, right from the centre of the back, where the owner might have shredded the leggings on coral).
The XJ40 gasket called for foam - this wasn't an engine gasket such as a valve cover or a water pump, but rather a weatherstripping seal for where the body met up with the fuel filler enclosure, and where water could enter, but air pressures (say, from speeding down the highway) could force the water through even the smallest of gaps. The fragments of the original gasket (note that the original gasket was not complete, which I strongly suspect was part of my water intrusion problem) showed it to be foam, and given the application, something with good compressability was called for. Rubberized cork might have been suitable, but I didn't feel that it would compress as well. Although situated in the fuel filler area, this foam gasket isn't expected to come in contact with petrol (this gasket is at the top of the well, not the bottom).
There are two primary methods I use for producing gasket templates. The lower tech version is also the appropriate method to use for larger items (such as a head gasket - though you should consider purchasing that sort of gasket rather than making it yourself).
I start by cleaning and drying the part. Next, I take a piece of pain paper and affix it to the object (a VERY LIGHT application of 3M Super 77 contact adhesive spray onto the part-facing side of the paper, let to tack for a few minutes before being applied to the part can aid keeping the paper from shifting around while you make the rubbing). When the object has alignment pins, it is a good idea to pierce them through the paper. Get everything secure, then take the edge of a pencil (or some artist's charcoal) and rub the surface of the item to take an impression, being sure to rub both the inner and outer perimeters, and hole positions. A variation on this is to take the surface of the item and wipe it down with a thin (but not too thin) layer of an appropriate type of gasket sealant, then lay it down on top of the gasket material, causing some of the sealant to transfer to the surface, and thus providing you with an outline to cut. Or, you could rub the (clean) part down with stamp ink and press it down onto your template paper.
The higher tech method is appropriate to smaller items: clean the part and lay it out on top of a computer flatbed scanner. Alignment pins complicate things somewhat, since they shift the focal plane (and thus, the scaling), so unless you're skilled at precise image scaling (which is possible, but beyond the scope of this document), don't bother with this method. Now, cover the object with a towel (otherwise, the scanner will pick up ambient light, and produce an image that will be near impossible to work with), Do a pre-scan, select the area of your object, set to 300 dpi and "Black and White PHOTO" (or "greyscale", but not simple "Black and White / bitmap"). Scan the image in, and load it into your image editing program (which needs to be something better than "Windows Paintbrush").
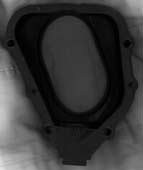
Obviously, as-is, the image doesn't appear to be useful for much of anything. However, good software allows you to adjust white/black points and gamma (the "midtone grey level" if you will), enabling you to extract a much more recognizeable image from the scan. Generally, you'll adjust the blackpoint up from 0, the white point down from 255, and the gamma from 1 to perhaps 1.4 or more. In the case of the scan represented by the above image, this resulted in:
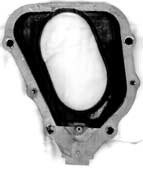
Okay, that's much more recognizeable. You could stop right here and just print this to a piece of paper, then make a sandwich: template + gasket material + cardboard + backing wood, held together with tacks. You might want to employ a light application of 3M Super 77 spray adhesive between the template and gasket material, so that as your cutting progresses, the template does not move in relationship to the gasket layer. The cardboard layer is completely optional, but provides several benefits: you can _hear_ when you've made a complete cut through the gasket material, it provides a smoother backing for the cut than a harder surface (such as wood) which results in a cleaner cut, and it spares your hard backing from too much abuse.
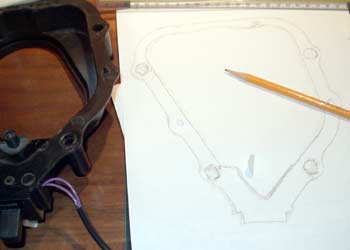
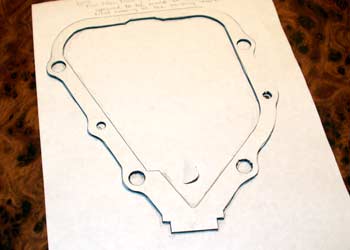
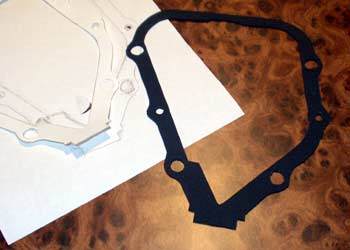
Cutting the gasket should progress as one might expect. If using a non-contact template (i.e. scanned), before cutting your gasket material, confirm that the gasket template is the correct dimensions - print an extra copy, cut the outline and punch the bolt holes and see that it lines up on the part. As I'd already done this a few times before, I show the cut gasket, with the template still affixed, resting on top of the original rubbed template:
Once you're resonably sure it is the right dimensions, you can set up to cut the gasket from a fresh copy of the template. A few pointers though - I find that cutting bolt holes and other details are much easier if performed FIRST, rather than after you have a delicate template flopping about. It also helps if you use a pushpin in the middle of each bolt hole (and, sometimes, the pushpin can provide the cutting diameter to simplify the tracing). After the holes are cut, I tend to cut the detail curves and corners, then finish up with the easy straightaways. While cutting, check that the template remains aligned with the gasket material (usually a non-issue if you've used a light application of spray adhesive). Make cutting strokes AWAY from the portion of the gasket you are using (for instance, when cutting into a corner, place the blade in the corner and cut outwards, rather than cutting in towards the corner) -- this can spare you from botching the gasket by over cutting it. If you're cutting gasket which was previously rolled, it's a good idea to try to get it flattened out before cutting, though when cutting the gasket, it may help if you lay out a ruler adjacent to where you're cutting (not necessarily using it as a guide), to hold the gasket and template flat. Once you're done, remove the template from the gasket. Do the same for larger pieces of "scrap" gasket material (such as the "hole" from the middle of a large perimeter gasket), since these can be used for producing smaller gaskets (such as for a thermostat, EGR, or even a mirror seal) later on.
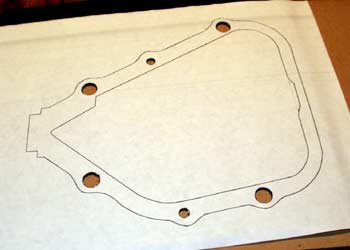
If you're so inclined (and equipped with the proper tools), you can produce a computer tracing of the template. You can scan in a pencil-rubbed template and do the same with that. I use a program called "Adobe Illustrator" - I load the scanned image in, produce another layer above it and then proceed to outline the image with "paths". When complete, remove the template image from the file and save the resulting paths as an Acrobat PDF file, which can be easily filed away, or shared with others. For the gasket produced for my XJ40, the PDF file is a mere 7Kbytes in size -- so small that a modem user could download it in about 2 seconds.
XJ40 Fuel Filler Gasket Template.
When you have gaskets on hand for a part, it can be beneficial to scan or photocopy these parts and file them away, since this will greatly reduce the work involved should you need to churn out a replacement gasket at a later date.
However you use the template you create, you should make a copy, clearly label it, and retain it for future use.
![[TOP]](/graphic/JagUpBar.gif)
Sean B. Straw
EMail to: Sean.Straw+Jaguar@mail.professional.org