Useful Tools and Gadgets: the Battery

| Last modified 2005 APR 07 04:40:04 GMT |
|
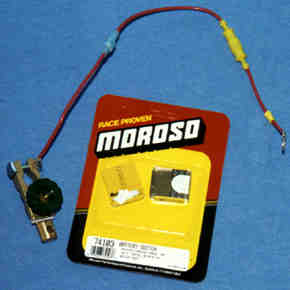
This is a battery cutoff which I purchased and modified to permit me to easily connect an inline multimetre to measure amp flow, then disconnect the battery (all the while maintaining trip computer and stereo settings, because continuity was never broken). The switch is a rotary post, and mounts directly on the battery terminal, and the original battery cable clamps to this (i.e. a non-hardwire modification). If I connect an inline ammetre to the .25" terminals before switching the current off of the main post, the battery circuit is uninterrupted in the vehicle, and I can measure current draws of various circuits and the standing current draw of the vehicle (which is 17mA in my case -- trip computer plus aftermarket stereo). For reference, it is a MOROSO #74103, and cost less than US$20. It has proven on several occasions to be a great investment, and with the modification, makes taking precision inline current measurements really quite simple - excellent for tracking down those mystery current draws some of us occasionally suffer. |
|
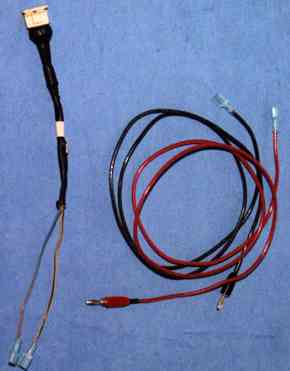
While ordering some other parts from Jaguar Heaven, I requested an
injector/temp sensor harness salvaged from a damaged wiring harness (that is,
I made it clear I was looking for an inexpensive connector, not a pricey
harness), which I then connected a pair of insulated 1/4" spade terminals
(for connect-disconnect to the metre). I also produced a pair of
bananna-to-spade cables to use with it (if you've been reading, these are the
same type of connectors I used on the bypass for the battery cutoff above).
This simplifies taking readings from any of several items in the engine
compartment which use this type of connector.
In response to a request posted in an earlier version of this document, a fellow Jag-Lovers list member who works for a company which produces aftermarket EFI components provided me with a couple pair of MATING injector plugs - that is, both the female plug which is what you see on the automotive harness, as well as the male plug which is equivalent to the contacts on the temp sensors or fuel injectors. I've taken one pair of these and soldered on insulated 0.25" spade connectors, such that I can connect them together, in addition to a TEE line, and can tap signals simply by plugging it inline to the original connectors. In addition to measuring operating voltage levels coming off of signals (reference to ground), you can also measure injection pulses using an o-scope. |

|
This is a simple side marker bulb socket (you could use any of a number of different sockets for this), cost about US$5 at any auto parts store. To this, I connected the now familiar 1/4" spade connectors (male on one lead, female on the other). I also made a short extension cable, using the same type of connectors - Male + Female at one end, and Female + Male at the other. With this tool and the battery cutoff modification above, you can easily test for current draw (you can connect this, route the wire over the side of the boot lid seal, and close the boot lid over the wire, and easily diagnose whether the boot lamps are remaining on, for instance. The lamp will burn with a variable brightness -- the more current something is trying to pull, the brighter the lamp will burn. |
At some time or another, every car owner - especially the DIY (Do It Yourself) type will need a good battery charger. Whether it is to recharge a battery after you accidentally leave the headlamps on, or to keep a top-up charge on the battery during months of storage (here in central California, we don't often put our cars in storage for the winter, because we don't get snow, ice, and as often happens in places which have cold weather - salt on the roads). Nevertheless, at some point you'll find yourself needing or wanting a charger.
I have a Schumacher PRO-SERIES 612-A-PE automatic/manual battery charger. Besides operational features, another nifty feature is the 5-year manufacturer's warranty. The charger has 2A (trickle), 10A (fast), and 50A (start assist) charging modes, as well as support for charging 6V batteries (which has been useful for charging some non-automotive gel-cells, but has no general _automotive_ purpose). I especially like the fact that the case is plastic - normally, I like metal stuff, but when it comes to electrical gear, sometimes plastic is a sign of a better thought-out product.
![[Schumacher Battery Charger]](batcharge.jpg)
Where I live currently, I don't have a serviceable garage - it's more of a narrow lean-to shed, so I don't park my driver in it. This poses problems when you have a need to charge the battery. I'm not keen on running an AC extension cable out across the sidewalk and to my parked car, with the battery charger sitting at the curb (sure, with the Jaguar, I could at least put this into the boot, but other cars don't offer this luxury). Instead, I leave the charger indoors, or up on my front porch, and run an extension from it down to the car. This has the added benefit of leaving the charger - with it's "Charge Complete" LED somewhere I can easily check it.
We can't talk about extension cables for charging systems without considering Ohms law as it applies here. The charge rate (2 or 10A for the charger mentioned above, as I never use the 50A start assist, and if I did, it wouldn't be from a distance anyway) times the resistance in the wire (long wires of any given gauge have more resistance than short wires of the same gauge, and small gauge wires have more resistance than large ones), equates to a voltage drop on the wire. When the dust settles, using an A/C extension cable to run out to the charger, and clipping the charger directly to the battery will result in less total power loss than doing it the way I describe here - BUT, as long as you use an appropriate gauge of wire (12 AWG is good) and don't run it TOO long, it's all nominal anyway.
Depending on the wire gauge, wire makeup, and material, resistance will vary, but as a reference, 1000 feet of 12 AWG copper has a typical resistance of about 1.98 ohms. Here, we're talking about 30-40 feet (but TWO conductors, so the in-circuit distance is actually twice that). That's 0.1188 to 0.1584 ohms of resistance introduced by the extension (for 30 and 40 feet respectively, both including the full circuit length). Ohms Law V(drop) = R(ohms)*A(amps) means that at a 2A charge rate, the extension will introduce a 0.24 - 0.32V drop in the charging voltage. At 10A, the drop would be more significant - 1.19 to 1.58 volts (the range is based on the 30 to 40 foot run lengths).
A larger gauge will introduce a smaller drop: 10 AWG (the next standard wire size larger than 12 AWG), has a resistance of 0.0744 ohms for the 30 foot extension - at the 2A charge rate this is only 0.15V drop, and at 10A, it's 0.74V drop - significantly less loss.
Needless to say, with the more significant voltage drops introduced by the higher charge current, I only run my charging at 2A over an extension. This is better for the battery anyway.
Now, back to the tools.
I produced my cable from about 40 feet of 12 AWG. I purchased clamps appropriate for battery terminal use - one end has clamps capable of clipping over the battery clamps on the battery terminals, while the other end doesn't open as wide (local parts source wanted US$2.50 apiece for the larger clamps), since I only need them to clamp on the smaller diameter studs of the terminal block. Note that you MUST make sure to match the +(red) and -(black) terminals at either end - if you can't read wire marks, a simple resistance/continuity check will identify the matched wire. I wouldn't use 14 or 12 AWG to do a 10A charge over a distance of 30 or 40 feet due to the voltage drop induced, and certainly not a 50A start boost (which I never use anyway). When doing a 10A charge, I remove the battery from the car.
![[JPEG IMAGE/8894 bytes]](power_cable.jpg)
For keeping bundles of wire from becoming an absolute mess, a good releaseable wiretie comes in handy. A good electronics store should carry these, but surprisingly, so does Home Depot, for something on the order of a couple of bucks for a package of ten.
![[JPEG IMAGE/5507 bytes]](releaseable_wiretie.jpg)
I built a terminal block for coupling the charger to the extension cable (you don't want the two leads contacting each other).
![[JPEG IMAGE/6936 bytes]](terminal_block-front.jpg)
![[JPEG IMAGE/6292 bytes]](terminal_block-rear.jpg)
As you can see, this accessory is trivial to make. Two appropriate sized bolts, four nuts, two bits of scrap wood (less than one square foot total), and a few screws to screw them together into an inverted 'T'. If you wanted to be really retentive, you could pick up a few center-screw rubber feet, and box in the sides (so if this fell over, the terminals would be less likely to contact anything). Drill holes sufficiently spaced apart in the vertical piece, and use nuts on either side to tighten the bolts into place. This has many uses - not only as a charging block for the charge extension, but also for dealing with the problem of where to source power for your Timing Light. Once you've used it, you'll wonder how you managed without.
For charging, I take the extension cable, clip the leads at one end to the terminal block previously described, run the wire wherever I need it to go (under a garage door, and out to the curb, or from my front porch, over a tree branch, and down to a car there, etc), then take the other end and connect the clips to the battery terminals. I then take my charger, and clip it to the terminal block, set the charger switches appropriatley, and plug it in. Removal of the wires is the reverse procedure. Following this exact sequence means you won't have to worry about a live current on the wire and accidentally contacting the clips while connecting things. The charger remains safely in the house or garage area, while the battery charges outside.
![[JPEG IMAGE/7075 bytes]](terminal_block_clamps.jpg)
![[TOP]](/graphic/JagUpBar.gif)
Sean B. Straw
EMail to: Sean.Straw+Jaguar@mail.professional.org