[Sean's Jaguar XJS Tech Pages]
Useful Tools and Gadgets: Hand Tools

---
Last modified 2005 APR 07 04:40:02 GMT

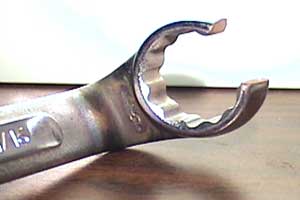
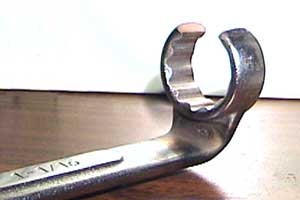
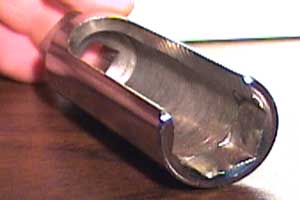
When I went to replace all the hoses on my A/C (all three were questionable for one reason or another), I ran into a wall. The hose fitting near the expansion valve is VERY fragile, not to mention a major hassle to get at. Torque the connection too much, and you're facing a US$2000 repair bill for a pro to take a look at your mess. The solution was to take a 1-1/16" box wrench and make it into a pipe wrench with a 90' bend. This is done by cutting out two of the notches (1/8 of the arc) from the wrench using a bandsaw (and a liberal dosing of cutting fluid). After using a dremel tool to sand the burrs from the cut, it will now slip over the metal pipe at the end of the refrigerant hose. I then had to bend it to approximatley 90 degrees (so one can hold the wrench handle VERTICALLY between the engine and the firewall), which was accomplished with the aid of an associate with an oxy-ascetelyne torch, clamping the box end of the wrench in a vise (with some copper plates inserted to act as a heat shield for the vise), and carefully heating the neck of the wrench very close to the box end and bending the wrench as it heats up sufficiently to make it pliable (yes, this takes a LOT of heat, and you want to be wearing appropriate utility gloves when holding the wrench). When you're done, you'll have a tool resembling the above.

What I did to remove and reconnect the fitting was take a 1-1/16" open-end wrench and laid it under the throttle tower and mated it to the lower fitting at the expansion valve. Have an associate use a large screwdriver or a prybar to hold the wrench in place (to keep it from turning). Then you take a pair of Vise-Grips (or other locking pliers) and clamp onto the modified wrench at the flat end, at 90 degree angle to the handle, then insert the modified end over the pipe fitting. Make sure your associate is anchoring his wrench the right way (for example, if you're removing the hose, you want to make sure the lower wrench doesn't turn counter (anti-) clockwise with the rotation of the upper fitting). Once you're sure you are doing it right, simply turn the wrench (with the aide of the Vise-Grips). Re-installation is just as easy (AND SAFE) -- just make sure to anchor the lower wrench from turning CLOCKWISE.

Beats the daylights out of removing the plumbing (such as the crossover) from the rear of the motor just to gain partial access to the fitting.

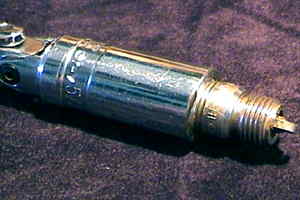
This is a standard O2 sensor socket. It is a deep well socket with a slice up the side so that the wires for the sensor can feed out the side while you are installing or removing the sensor.

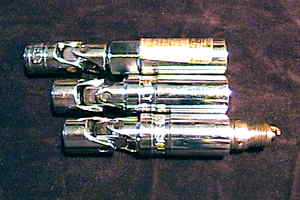
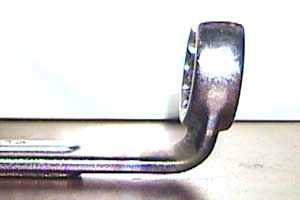
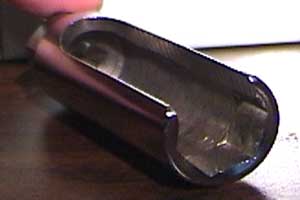
Locate a spark plug socket with an INTEGRAL u-joint, then cut the socket to the length necessary to just enclose a spark plug (without an excess of depth), and you'll shave an inch or more off of the clearance necessary to remove plugs. This is crucial for the front plugs on the V12 - if you have the original Jaguar toolkit socket, or this modified generic, you can replace those plugs without moving the AC compressor.

[JPEG IMAGE/9631 bytes] Tired of crushing your jackpoints in your heavy duty jack? Take some suitable blocks of wood (a chunk of 2x4 would do nicely, though these here are the cross sections of a 4x4), and drill a 1" hole in them. You can then guide the jack point into the hole as you raise the jack, and you won't compress it. Alternatley if your jack has a removable dish, and if you're reasonably good with a welding torch, you could fashion a new dish insert with a hollow in it for the jacking point.

It can't be stressed enough that when jacking your car, you should take all precautions - quite literally, your life hangs in the balance.

[TOP]

Sean B. Straw
Post Box 751224
Petaluma, CA 94975-1224 USA

EMail to: Sean.Straw+Jaguar@mail.professional.org


---
Contents Copyright © 1998-2024 Sean B. Straw, All Rights Reserved. Theft will not be tolerated.